What Most People Get Wrong About the KDP 2024–2025 Monthly Pocket Planner
When you decide to create or buy a KDP 2024–2025 Monthly Pocket Planner, the initial excitement can quickly turn into frustration if you overlook a few key details. I have seen many people—from beginners to experienced creators—rush through the process only to end up with a planner that does not quite work the way they expected. The good news is that most of these issues are entirely avoidable if you know what to watch for.
This article walks through the most common mistakes, misunderstandings, and overlooked details related to the KDP 2024–2025 Monthly Pocket Planner. Whether you are designing one for yourself, your clients, or your own Amazon KDP business, the advice here will save you time, money, and a fair amount of headache.
Mistake #1: Ignoring the No-Bleed Requirement
One of the most frequently overlooked specifications is that this interior is designed without bleed area. Many people assume that all KDP interiors should include bleed, but that is not always the case. When you use a no-bleed layout, your content must stay within the trim size margins. If you extend elements like backgrounds, images, or colored boxes to the edge, they will get cut off during printing.
I have seen planners where page numbers, decorative borders, or even calendar grids disappear into the abyss of the printer’s trimming blade. That is a costly mistake. The fix is straightforward: keep all important content at least 0.125 inches inside the trim edge. If you are using the ready-to-upload PDF from the KDP 2024–2025 Monthly Pocket Planner set, check that every page respects the no-bleed guideline. If you are editing the Canva template, enable the margin guides and do not place anything critical near the edge.
This is not just about avoiding a bad print. It is about ensuring your planner looks professional and functions as intended. A planner with clipped dates or missing task lines is useless to the end user.
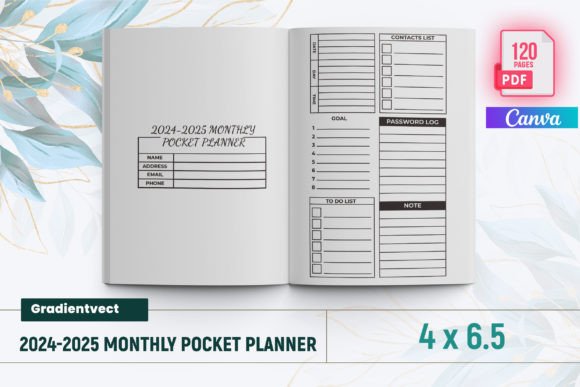
Mistake #2: Misunderstanding the Trim Size
The 4 x 6.5 inches format is tiny compared to standard planners. That is exactly what makes it a pocket planner, but it also means every inch of space must be used wisely. I have watched people try to cram too much information onto each page, resulting in cramped text and illegible numbers.
If you are designing from scratch, resist the urge to add extra columns, overly detailed sections, or tiny fonts. The 4 x 6.5 size works best when you keep layouts clean and prioritise the most essential information. The ready-to-upload PDF that comes with the package is already optimised for this size, so if you are starting there, you are ahead of the game. But if you decide to customise the Canva template, keep font sizes at 10 points or larger for body text, and at least 12 points for numbers on the calendar grid.
Another detail: the spine width for such a small book is negligible, so do not design anything that relies on a visible spine. Stick to flat-lay layouts that open easily.
Mistake #3: Overlooking the 120-Page Limit
120 pages might sound like a lot, but once you include an intro page, a belongs-to page, 24 monthly spreads (12 for 2024 and 12 for 2025), a contact list, a password tracker, a to-do list, birthdays, notes pages, and additional sections, the page count fills up fast. I have seen creators run out of room for the notes section or forget to leave space for the password tracker.
Plan your page allocation before you start designing. For example:
- Intro page: 1 page
- Belongs to: 1 page
- Monthly planners (24 months): 48–72 pages (depending on whether each month gets one or two pages)
- Contact list: 2–4 pages
- Password tracker: 2–4 pages
- To-do list: 2–4 pages
- Birthdays: 1–2 pages
- Notes: 10–20 pages
If you find yourself over 120 pages, cut redundant sections rather than squeezing content. A clean, well-paced planner is more useful than one that tries to do everything poorly.
Mistake #4: Forgetting That the Calendar Covers Two Years
This planner spans from 2024 through 2025. That means you need separate monthly spreads for each year. I have seen designers accidentally reuse the same 2024 months for 2025, or worse, omit the 2025 months entirely. Check your PDF or Canva template to confirm that all 24 months are present and correctly labelled.
A useful habit: after finishing the design, flip through every page in order. Verify that January 2024 comes first, followed by February 2024, and so on until December 2025. If you are using the pre-made PDF, this verification is quick. If you are editing the template, double-check each tab or label.
Mistake #5: Skipping the Belongs-To Page
That belongs-to page might seem like a trivial detail, but it serves an important function. It personalises the planner and reduces the likelihood of it being tossed aside if misplaced. I have seen many planners fail to include this page, and while it is not a dealbreaker, it is a missed opportunity for connection.
If you are creating the planner for yourself, fill it out immediately. If you are selling it, ensure the belongs-to page is included and formatted correctly. The package includes it, so you simply need to keep it in the layout.
Mistake #6: Underestimating the Value of the Extra Sections
The contact list, password tracker, to-do list, birthdays, and notes pages are not afterthoughts. They are what turn a simple calendar into a comprehensive life management tool. I have seen people delete these sections to save space, only to realise later that they needed them.
Consider how you will actually use the planner. If you manage multiple online accounts, the password tracker is invaluable. If you frequently make lists, the to-do section keeps everything in one place. My advice: keep all the sections included in the package. They are balanced for the 120-page count and designed to complement the monthly spreads.
If you must customise, at least preserve the password tracker and contact list. Those two sections alone justify the pocket planner format for many professionals.
Mistake #7: Overcomplicating the Design
Because the package comes with PNG and JPG files, some people feel tempted to layer complex graphics, heavy backgrounds, or multiple fonts. That approach backfires in a 4 x 6.5 planner. The small page size means that every decorative element competes with functional content for space.
Stick to one or two fonts maximum. Use light or subtle backgrounds if you use them at all. The PNG and JPG files from the package are already designed to be clean and readable. If you are adding your own branding or custom colours, keep contrast high and decorative elements minimal. A simple, elegant design always outperforms a cluttered one in a pocket-sized format.
Mistake #8: Not Testing on Amazon KDP Before Publishing
The product description states that the files were tested on Amazon KDP to ensure quality. That is a huge advantage, but only if you do not modify the files in ways that break compatibility. If you edit the PDF, change dimensions, or alter the resolution, you should re-test.
Upload a draft version to KDP and use the preview tool. Flip through every page. Check that no content is cut off, that margins are consistent, and that the file meets KDP’s specifications for no-bleed interiors. This step takes ten minutes and can save you from a rejected upload or a batch of poorly printed planners.
I have seen people skip this step and later receive proof copies with misaligned grids or missing page numbers. Do not let that be you.
Mistake #9: Ignoring the Difference Between PNG and JPG Usage
The package includes both PNG and JPG files. Each format serves a different purpose. PNG files preserve transparency and are better for editing in Canva or other design tools. JPG files are smaller and easier to upload quickly, but they do not support transparency.
If you plan to customise the template extensively, start with the PNG files. If you are uploading directly to KDP with minimal changes, the JPG files are perfectly fine. Mixing them up can lead to unwanted white backgrounds or loss of image quality. Keep them organised in separate folders to avoid confusion.
Mistake #10: Procrastinating on the Download
This might sound like a soft point, but I see it all the time. People find the KDP 2024–2025 Monthly Pocket Planner download, bookmark it, and then come back weeks later only to discover the offer has changed or the file links expired. If you need this planner for the current year, download it now. The 2024 months are already ticking away.
Once you have the files, store them in at least two locations: your computer and a cloud backup. That way, even if you need to revisit the template later for 2025 updates, you will not have to search for it again.
Final Thoughts: Small Planner, Big Impact
A well-designed monthly pocket planner is one of the most practical tools for staying organised across two years. The KDP 2024–2025 Monthly Pocket Planner package gives you a strong starting point with a ready-to-upload PDF, editable Canva template, and supplementary PNG and JPG files. But the tool is only as good as your attention to the details that make it work.
Avoid the ten mistakes outlined here: respect the no-bleed requirement, honour the trim size, allocate your 120 pages wisely, verify both calendar years, keep the extra sections, simplify your design, test your uploads, use the right file format, and download everything promptly.
By doing so, you will end up with a polished, functional planner that serves you well through 2024 and 2025. Whether you are a creator, entrepreneur, freelancer, or anyone trying to keep life organised, this small book can make a surprisingly big difference.